 English
 Slovenčina
REGULATORS
posted by siteadmin
on 4 apríl, 2007 - 00:00
After your brain and body, your regulator is the most important part of your equipment. It should be regarded as a piece of life-support equipment and as such you should choose and maintain one with care.
For many people new to diving, the choice of regulator is influenced by any number of factors such as:
- Shop recommendations
- Instructor recommendations
- Club recommendations
- That’s what I used when I learned to dive.
While most sources can be well meaning, the advice given is not always good and there may be ulterior motives, which you should be aware of. Dive shop assistants or owners are often the worst people to get advice from as their recommendations are often influenced by the margins that can be made on a particular product. Club equipment is often at the lower end of the market in terms of performance and durability due to cost constraints within the club. Other club members and instructors will typically recommend what they use without necessarily even knowing the type of valve they are using (e.g. balanced vs unbalanced; piston vs diaphragm; upstream vs downstream). These three characteristics have an important bearing on the performance, reliability and failure mode of the valve.
What to look for in a regulator
Your choice in regulator is one of the most important decisions you will make in buying diving equipment. You should first of all look for something that is tried and tested. New products may look good and the advertising may highlight many unique features, but this gives no indication of how it holds up to time and use. Next, you need to avoid regulators with special fittings or non-standard parts. In the event of a problem, non-standard hoses or parts can be difficult to get hold of – especially if diving abroad.
The final considerations are the ease with which it can be stripped down (even underwater) and the design of the first stage for efficient hose routing. A regulator may fail underwater for many reasons, but a majority of cases are the result of debris or other foreign objects getting into the second stage, partially opening the diaphragm or blocking it. In these circumstances, the second stage can be opened up, the offending object removed, re-assembled and returned to normal use. If the second stage does not allow you to do this, you should look at other options.
First Stages
First stages broadly break down into 2 groupings – piston and diaphragm. The piston design is slightly superior and far simpler in terms of operation with fewer moving parts. This allows easier work of breathing (WOB) and will also take more abuse than a diaphragm. However, this is not to denigrate the diaphragm, as there are some wonderful diaphragm first stages on the market. The best piston design available is the Mk 20 by Scubapro. The best diaphragms are the TX50 and US4 by Apeks.
The placement of ports on the first stage is also an important consideration. Poorly routed hoses will result in loops that will catch on wrecks / rocks etc. and sometimes result in compromises elsewhere in your kit. Ideally, all hoses should point down thus minimising the risk of loops that will cause entanglements. You also need a minimum of 4 low pressure and 1 high pressure port. If we look at the Mk20, it has 5 LP ports and 2 HP ports. The big advantage that the Mk20 has here is that there is a port at the end of the regulator thus facilitating hose routing. The TX50 first stage has 4 LP ports, but one of them is a non-standard size, so an adaptor is recommended if you need all 4 ports.
For diving in colder waters – such as we experience over the winter, it is important that the first stage is not overly prone to problems such as free-flowing. A free-flow can be initiated at either the first or second stage of a regulator, so some thermal protection is preferred. It is less easy to insulate piston first stages, but the Scubapro Mk 20 is insulated with their TIS (Thermal Insulation System). Diaphragm regulators are easier to insulate and this is done by putting alcohol (or similar) into the open area facing the diaphragm and sealing that.
Various manufacturers have introduced ultra-light first stages that should be avoided at all costs. These are made from Aluminium and are prone to breaking and corroding over time.
Second Stages
Second stages are driven by a diaphragm that opens a valve when you inhale. Most regulators can be classed into 2 groups – side breathing such as the Poseidon Jetstream and Oceanic Omega and front breathing such as the Scubapro G250 and Apeks TX50. There are also 2 other groupings – upstream and downstream regulators. The difference is primarily their behaviour in the event of failure – an upstream fails closed (no gas) and a downstream fails open. In the UK, Poseidon are the only upstream regulators. You need to consider how important you regard the method of failure.
Most regulators have the hose feed in from the right but some newer models can feed from either side. This is a simple procedure that most shops can do for you. As I said above, you should be able to strip down a regulator easily (and even underwater). Many regulators on the market do not allow this and should therefore be avoided.
When choosing a backup regulator, you should opt for an unbalanced design. This design is far less prone to free-flow - a very important consideration for cold water and diving in currents (they're also cheaper ;-)
General
Some regulators show reduced performance with time after servicing. It is important to choose a regulator that maintains good performance over time without the constant need for re-tuning - such as Poseidons (quickly loose their performance after servicing). The more complicated the design the more to go wrong and the higher the price of the “service kits”.
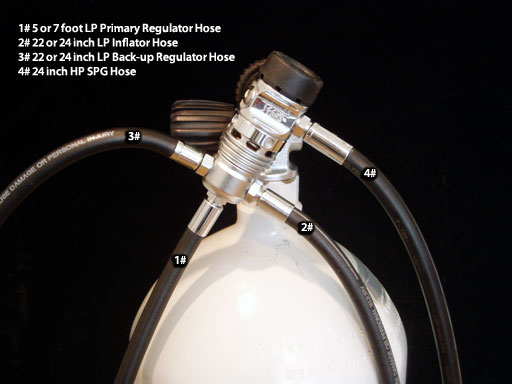
The picture below shows how to correctly route your regulator.

For a more detailed explanation and discussion about the different types of regulator, their characteristics and they way they work, there is a good book that explains this clearly (see reference section).
HIGH PRESSURE HOSE, CONTENTS GAUGE & CONSOLE
The standard High Pressure (HP) hose that you would get if you walked into most dive shops is 36 inches long. With a console attached to the end this increases to 42 inches. Even when using a single cylinder this is far too long as the console (even when the HP hose is run through a plastic hose guide, Velcro retainer or pocket) hangs below the diver when in the horizontal position. With a twin-set the problem is worse as the 1st stage of the regulator is now to one side.
Having the console dangling in the water increases drag, increases the chance that it will get wedged on a piece of wreckage and will mean that it will get battered around a lot (not something you want to be doing with a HP gauge!). For wreck penetration dives and cave dives this is an absolute “No, No”; and for open water dives it still does not make sense increasing your chances of a problem.
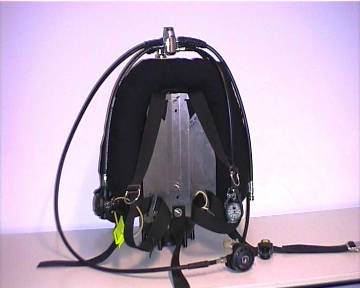
A better solution is to have a shorter 22-inch HP hose with a simple HP contents gauge on the end. The picture below will aid explanation:

Note that the HP hose comes down the left side and that the HP is clipped onto the left D-ring of the waist strap using a stainless steel piston clip. You will also notice that there is no large and cumbersome console. The compass is kept in a dry-suit pocket (one of these pockets is situated on each thigh). Dry-suit pockets are a great place to stow things out of the way and they are easier to get in and out of than pockets that are part of the stab jacket. If using a wetsuit, you would use a pocket on the waist strap as shown on page 4. You rarely need to use the compass for the entire dive. When it comes to use the compass you get it out and hold it in the palm of the hand or strap it to your wrist using bungee cord. Navigation is actually easier and more accurate this way too because you are free to hold the compass where you like (up to eye and straight in front of you).
Traditional consoles often have a depth gauge as well as the pressure gauge. For most recreational dives, given the reliability of dive computers and digital depth timers, there is no need for a console mounted depth gauge. When diving as part of an experienced team, there is an argument for only using just the one.
In the above picture the piston clip is attached to the HP hose using cave line. I use an old medium sized O-ring. Both could be easily removed if needed by either cutting the line or in my case, pulling the contents gauge hard so that the O-ring that attaches to the piston clip breaks. Stainless steel piston clip shown below.

Picture - Stainless steel clips
Stainless steel clips are harder to find in shops than brass ones but the sliding mechanism on steel ones is much smoother and they don’t cut your fingers (soft from in-water exposure) like brass ones do. When you want to read your contents gauge you always know exactly where it will be and you simply unclip it, look at it and then replace it. In this position the gauge is in the slipstream, it is not going to get hooked up on anything, nor is it going to bang around.
Additional considerations:
- A rubber console covers the connection point where the HP hose attaches to the contents gauge. To make the console swivel you need a small swivel pin with 2 tiny O-rings at each end. These O-rings can gradually wear if grit and sand gets into the connection and is left there for some time. Each turn of the swivel can gradually wear them thin. I don’t know how, but even with a rubber console covering this area, grit still gets in there. When you come to clean your regulator the rubber console prevents you washing this grit away, despite a “good soak”. How often do you check under the console? Not very often. Without a console the connection area gets a thorough clean and the grit is washed away. I used to use a console and over a 7 year period had several leaks from this swivel connector. I have seen many others. Since getting rid of the console (about 2 years ago), I haven’t had a problem and, on inspection, the 2 tiny O-rings are in much better condition.
- If you were to experience a leak from this swivel connection, you would notice it sooner without a rubber console. The rubber console obscures the joint. You would therefore be at an earlier stage of the dive with more gas and your tissue saturation levels would be lower (emergency ascent less risky). With a twin-set you would simply shut down the left pillar regulator that fed the HP hose.
- Most of the times I have seen the swivel joint “blow” it has been whilst initially pressurising the regulator (pressure and pressure change greatest) on the boat/shore. Without a console it is much quicker to repair the swivel joint (by replacing swivel pin or carrying 2 of the tiny O-rings) as you don’t have to remove the rubber console.
Isn’t the contents gauge vulnerable without the protective rubber?
No because of where you clip it. A contents gauge protected by a rubber console bashing into things is far more vulnerable. The case against the AP Valves AutoAir, Air II (or similar).
- Everyone should be diving with 2 second stages anyway (be it a primary regulator plus octopus on a single tank or a twin-set with 2 first stages and 2 second stages), you must then ask the question, what does the AutoAir add? It provides no more redundancy. The negligible benefits (3rd unreliable regulator on a stupidly short hose) as outlined in 1) are more than outweighed by the costs, namely:
- Introduction of more failure points
- Their tendency to free-flow when not regularly serviced or gritty (you tend to take your regulators off you set when transporting/filling etc, you don't take the AutoAir off the jacket so it is more abused/exposed to grit etc).
- Overly large & cumbersome object in the all important chest area = clutter
- The connection from the Low Pressure Hose to the AutoAir is not compatible with any other Low Pressure connectors.
You cannot therefore swap over very easily if you use different length hoses for different types of diving (e.g. single tank to twin-set). And more importantly, the low pressure direct feed hoses to your wing/stab and dry-suit should be interchangeable. If either fails you can swap it underwater. This happened to me on one dive where I had to shut down the 1st stage that fed my dry-suit as part of a training exercise. I was getting bad suit-squeeze, as I couldn't put air into my dry-suit. I simply disconnected the direct feed to my wing and plugged it into my dry-suit to squirt some air in and get rid of the squeeze. I then put it back onto my wing. Clearly this would not be possible if I had had an AutoAir, as the connectors are incompatible.The solution is simple; ALL low-pressure connectors should be the same, period.
And finally and perhaps most importantly, - The positions of the purge, inflate & deflate buttons are non-standard. I have personally seen trainees (on more than 1 occasion) try and dump from the stab jacket whilst doing a CBL and not succeed = uncontrolled ascent. What they were actually doing was pressing the purge button of the Auto Air regulator (where the deflate button normally is situated) thinking that they were letting air out of the stab. In fact they were just purging the AutoAir reg. Air comes out nonetheless but from the cylinder and not from the stab!
I am not aware of any other inflate/deflate in the world that has the same position of buttons. Pointing out the irregular position of the buttons to your buddy during the buddy check is one thing. Your buddy reacting correctly and QUICKLY in the stressful situation of an emergency is another.
- Prihlásiť sa pre odoslanie komentárov